Buy anything from 5,000+ international stores. One checkout price. No surprise fees. Join 2M+ shoppers on Desertcart.
Desertcart purchases this item on your behalf and handles shipping, customs, and support to Indonesia.
🔥 Stay cool, stay smart — wireless comfort that works as hard as you do! 📲
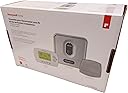
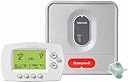
The Honeywell YTH6320R1001 Wireless FocusPRO Thermostat Kit features RedLINK wireless technology for reliable, interference-free HVAC control. It includes an Equipment Interface Module and Return Air Sensor to maintain safe indoor temperatures even if the thermostat loses power. Designed for easy DIY installation, it supports multi-stage heating/cooling and offers a clear digital display with outdoor temperature and humidity readouts. With up to 1 year battery life and programmable settings, it’s the smart upgrade for millennial professionals seeking effortless, zone-specific climate control.


| ASIN | B001O4F8Y4 |
| Additional Features | Time - Wireless |
| Backlight | Yes |
| Best Sellers Rank | #63,601 in Tools & Home Improvement ( See Top 100 in Tools & Home Improvement ) #82 in Home Programmable Thermostats |
| Brand | Honeywell |
| Brand Name | Honeywell |
| Color | White |
| Connectivity Protocol | Wi-Fi |
| Connectivity Technology | RedLINK, WiFi |
| Control Method | Remote |
| Controller Type | Push Button |
| Customer Reviews | 4.6 out of 5 stars 482 Reviews |
| Display Type | Digital |
| Finish Types | Glossy |
| Global Trade Identification Number | 00085267329408 |
| Included Components | Equipment Interface Module, Return Air Sensor, Wireless Thermostat |
| Item Dimensions D x W x H | 4.38"D x 5.56"W x 1.25"H |
| Item Type Name | Wireless Focuspro Thermostat Kit |
| Item Weight | 454 Grams |
| Manufacturer | Honeywell |
| Manufacturer Part Number | YTH6320R1001/U |
| Model Name | Honeywell YTH6320R1001 Wireless Focuspro Thermostat Kit, Programmable Redlink Enabled |
| Model Number | YTH6320R1001 |
| Mounting Type | Wall Mount |
| Number of Batteries | 2 AA batteries required. |
| Power Source | Battery Powered |
| Product Dimensions | 4.38"D x 5.56"W x 1.25"H |
| Product Style | Wireless |
| Shape | Rectangular |
| Special Feature | Time - Wireless |
| Specific Uses For Product | Cooling, Heating |
| Specification Met | certified frustration-free |
| Temperature Control Type | Cooling, Heating |
| UPC | 085267329408 |
| Unit Count | 1.0 Count |
R**T
Suuuper-easy to install
This is one of the greatest products ever! I wanted to add zoning to our upstairs unit so that we could have separate control for our master suite, home office and guest room because the temperatures were so different and with only the one thermostat, the office would end up way too warm in the summer and we'd have to set the master to freezing cold to get anything close to comfortable in the office. Sure, I could have spent time pulling wires, but with this, why? All our other thermostats are focusPros and I really like the simplicity of them. Yes, I used to be all into the fancy touchscreens and such, but since we bought this new house I've decided I prefer the more minimalist interface of these; simple buttons for up, down, and mode settings, clear display, etc. We don't use any of the programming and just set the temp we want and pretty much leave it there. Don't get me wrong, this is a powerful thermostat and can control even the most advanced systems (up to 3H, 2C plus heat pump and aux I believe) and it works with the remote comfort control as well. It took me literally minutes to install; just mount the thermostat where you want it, install the EIM (which is the receiver) near the equipment, sync and done! I used this for our second zone, so I just wired the EIM to the zone panel and it wires just as if you were hard-wiring a thermostat directly. Connections are clearly marked and easy to do. Everything works flawlessly and temperature control is very accurate. Installed the thermostat in our office since it's the room we use the most and added the remote comfort control, which is in the guest room, so when we have guests staying with us they can control the temp of that room from there by selecting 'Sense temp from: This Device'. Once they do it takes control and the thermostat will display 'Remote has control' and show the set temp and current room temp on the display. The whole system is awesome! You can also use this to easily re-locate an existing thermostat. However, after reading many reviews of this product I noticed many people saying that the EIM (receiver unit) goes where the old thermostat was, which while technically possible, is not how it's intended to be installed. The EIM goes near the equipment itself; you just disconnect the existing thermostat wire at the equipment and run a new (fairly short) wire from the EIM to the equipment. You then place the new thermostat where ever you want and you can tuck the old wiring into the wall and cover the hole however you like. Honeywell really created a great product here with this kit and we couldn't be happier. All our rooms are now comfortable because each thermostat reacts to the environment of each room separately.
A**M
Straight-forward solution to an annoying problem
This thing finally solved a problem. On the second floor of my house the thermostat is in a bedroom that gets sun all morning and is in the shade all afternoon - so every other room on the floor is either too hot or too cold depending on the time of day. Moving it through the wall behind just puts it in a different bedroom (same problem), moving the line out to the hallway would involve drilling through many studs and maneuvering around doors. Whatever genius installed the system never bothered to connect the C line through from the basement two floors down and across the house, so using a smart thermostat would require a lot of wiring and effort. With the Honeywell, the base unit sits in the basement attached to the boiler control unit (R, W, C) while the thermostat can be placed anywhere in the house. Having it sit in the hallway between all of the bedrooms seems to work perfectly well. Setup took maybe 20 minutes and instantly all three rooms are at a more moderate temperature.
E**M
Simple install
I purchased this model because the existing thermostat in our home is in a location that seldom reflects the temperature and the rest of the home was either too hot or too cold no matter how we tried to balance the.vents. The kit has three parts - a large (ugly) control unit, the thermostat proper and a return air sensor box. The control unit and the return air sensor are designed to be mounted next to your furnace, which is why the ugly factor probably doesn't matter much. I had to get a spool of 5 wire thermostat cable to properly connect this unit - I have a simple single state heat/cool conventional forced air system. At least a 7 wire wire is needed for two stage and/or heat pump systems. I completed the install myself even though every single DYI site emphasized in very direct language "contact your service professional" which in my case meant a $250 to $500 visit, plus the cost of the unit. If you're remotely adept at wiring simple projects and can read, the install manual is very clear with excellent diagrams for several standard configurations including multi-stage and heat pump configs, and you just need to connect the wires to the right color based on the existing thermostat hookup. If wiring is not your thing, call your HVAC service company. Mine didn't have a common wire that provides power to the control unit (my old thermostat just used batteries). I needed to add that, so before purchasing this unit, make sure your furnace has such a terminal output. I was able to google the manual for my 14 year old furnace and get the wiring diagram for it - I also took the panels apart on my unit to verify it matched what the manual said. The terminals on the furnace were clearly labeled although I verified with a volt meter before doing anything. The other thing you want to do during the install is trip the breaker going to your furnace while you do the connection, even if the furnace has a safety switch when the panels are removed. All in all, the install took about 15 minutes from start to finish, and the unit works great. The thermostat unit is a bit heavy and large - but it works from every room in my two story home. Uses a couple of AA batteries and the manual was also well written. The return air unit is optional, but it's used if the thermostat looses connection to the main unit for any reason, and keeps the furnace/cooling operating based on presets. It involves two wires and drilling a hole in the return air vent going back to your furnace. I haven't installed it yet, but will shortly because I think it's a good safety feature. Because the wireless is not internet enabled (looks like a proprietary protocol used by Honeywell called redlink), chances of the furnace controls being hacked are reduced as the unit needs to "sync" with the control unit by pushing a button on the control unit to put it in listen mode, and then pressing a corresponding button in the setup menu of the thermostat. An internet gateway can be added to the system if you really feel the need to see your furnace controls via the web, but I think personally it's just too much of a risk and cost for what you get. Do I really need to see the temp on my phone? I suppose it can be useful in some cases, I just didn't see the point for me. There's also an external sensor you can add to this unit - the manual doesn't really explain the benefit of that - I can't tell if the external sensor allows the thermostat unit to respond differently and learn how your furnace and your house responds to heat/cool cycles. Some high end furnaces do that, not sure if this unit would do that or not. My setup is so conventional that these extras seem like bling more than function.
L**A
Perfect for us to save on propane and just heat where we want the heat to go
This works perfectly for us and our home. We have propane and we also have a huge great room with cathedral ceiling. It takes a lot to heat it. We use our fireplace with a blower as well as a pellet stove in another room. However, when we go to bed and just want heat in our bedroom, with this thermostat kept in our bedroom, we are able to turn it on about 8pm and have just the bedroom heated and not have to waste propane all night to heat the rest of the house.
Z**R
First Impressions
This kit arrived very quickly in a single box. Installation was fairly straight forward but will depend on your particular furnace. I have a newer (2005) Sears Gas (less than 90% efficiency). For installation, I diagrammed my current wired thermostat configuration from the furnace, and the interconnection of the wire from the compressor. I found this was the only way to properly match up the wires with the expected connections. The connections coming from the furnace are pretty straight forward one for one, color coded. Only the A/C compressor was off color. For example I had a white and red coming off my A/C, the red matched up to the yellow on my old thermostat and the white was connected to the black. Once I had diagrammed it out it was fairly easy to see where they would go on the EMI unit (large grey box). The defaults on the unit for GAS are less than 90% efficient furnaces. If you have a 90% efficient you need to set numerous settings (you should probably download the installation manual) to verify you know all the answer. You do need to screw the unit to the furnace near enough to the wiring harness to attach wires. Also, the air duct sensor (in case your thermostat dies) it senses a temperature drop and kicks the unit on to prevent it from going lower than 62. Installation involves drilling a hole for the shaft and two sheet metal screws. So far its working like a champ. Main unit in basement, the thermostat 3 floors up.
K**M
Works Great But Professional Installation May Be Required
The Honeywell Wireless Thermostat kit works great! I live in Miami. My HVAC system is a single stage cooling and heating unit. The air handler and outlet air plenum are inside a downstairs closet located in a hallway next to the existing thermostat. My upstairs master bedroom is always 2 two 4 degrees warmer than the downstairs. After installation of the EIM by a professional, I mounted the wireless Thermostat in my upstairs master bedroom and set the temperature to 75 degrees. Now my master bedroom is a comfortable 75 degrees as is my downstairs. I had to have an HVAC Pro install the EIM as the existing thermostat had only four wires and the EIM requires 5 wires. I didn't know how to rewire the existing system for the 5th wire. The Pro, who also happened to be a personal friend and did the job gratis, installed a 5 wire cable into the EIM and then routed the wire into the air handler where he wired the EIM cable into the existing air handler wiring. I watched him do it and honestly have to say that it's not something that I could have done myself. He mounted the EIM to the exterior of the outlet air plenum inside the closet using HVAC Tape. See pictures. The EIM installation took the Pro approximately 30 minutes to complete. I am very happy with the result and highly recommend the Honeywell Wireless Thermostat Kit. But be prepared to have a Pro install your EIM, unless you are adept at HVAC wiring.
A**R
Love it and way to go!
Got it within 3 days from the time I ordered even with the free shipping option. Thanks to Amazon courteous service. I am not a professional in this business, just tinker with toys around the house for fun. Just note the color code from the old thermostat, move them to the new one and voila. Initially it took me a little time tracing back to the air conditioning unit in the garage for the wiring, because I could not get it powered up! But with a multimeter, I eventually found out that I had to connect the common wire to the C terminal of the new unit and that's it! Somehow my old thermostat uses only 4 wire (Blue - fan, Yellow - AC, White - Heat, and Red - power), and the new one requires five (Blue - fan, Yellow - AC, White - Heat, Red - power, and Brown - common). I later found out that this is the same problem encountered by another reviewer! Anyway, as soon as it powered up, I hit the connect button on the EMI and man, the wireless thermostat synced up and I just went through the program and took the default settings. I took the new "baby" up stair and, let me tell ya, there is nothing better than a good night sleep with the AC works properly, where and when you want it. One best thing I noted is that it limits the recycle time of the compressor to no less 5 min (default setting) to prevent damages to the thousand $$$ AC unit. It is such an investment that I should have spent my money on much earlier. Don't settle for the cheap one, I DID mistakenly simply because my AC is 28 years old! I like the thermostat too because the buttons and functions are very intuitive. One thing I have to say is that, be prepared to call the HVAC guy if you can't figure it out in case your installation goes sour! I did call Honeywell customer service when it did not work initially (due to the missing wire to C terminal, hah), and got a polite answer that this model is only for professional install, not by guys like me. So I took challenge and did it :-)
P**R
Easy INstall
Excellent easy to install
G**S
Système de climatisation et Biénergie
La pareille super il ne fonctionne pas si vous avez un biénergie.. Regardez plutôt pour le prestige..Mais la machine wow pas de négatif..Merci à vous et Amazon…
A**N
works but there's a a lot of cheapness for how expensive it is
It works okay, but there is a LOT of profit built into the price of this item and a lot of price saving shortcuts. It's a very basic programmable thermostat ($30) split into two pieces, re-connected by the guts of a wireless light switch (also $30), yet somehow ends up being $400. Cheaper versions (from different manufacturers) appear to be junk, so I bought this. Despite the inflated price, there are some cut corners: - the duct sensor is a hardwired probe a few inches long, to be installed in a hole drilled in the return air duct. Its purpose is to prevent extreme temperatures if the wireless unit disconnects. However there's no way to tell if it's working, other than disconnecting your thermostat and waiting for the house to cool below 15 degrees. A couple of LED indicators or even a numeric indicator would be welcome. - the simplest install would be to put the base where the old thermostat was, connecting to existing wiring, but that duct sensor is way too big unless you want a meat thermometer looking thing protruding into your living room. They could have included a plain thermocouple (a $5 part) for install under the plastic housing of the base unit, or documented the type of thermocouple (a $0 effort) for the end user to purchase one himself. - the quick connect terminals on the base look and feel like the cheapest flimsiest thing in the world. Better spring terminals, or even simple screw-down terminals, would be preferable. When you install, secure the incoming wire near the base unit (with a cable tie or similar), to relieve strain on these very inexpensive terminals.
Trustpilot
1 week ago
3 weeks ago